目前最流行的Spring框架
简介
简单介绍
springBoot按照开发习惯对原来的xml配置提供了预配置,开发人员使用springBoot框架,不用再手工配置xml
springBoot按包依赖习惯,提供了各个常用模块的依赖启动器starter,
- 官方提供的启动器如:spring-boot-starter-*
- 第三方的启动器如:*-spring-boot-starter
- 比如web模块,test模块,mybaits模块,redis模板…
项目结构说明
src/main/java/*Application:启动类,主类
src/main/resources/static:静态资源路径(css/js/图片/视频。。。纯静态资源)
src/main/resources/templates:视图模板文件。(html加thymeleaf模板引擎)
src/main/resources/application.properties:项目核心配置文件。改默认配置的地方
pom.xml
父工程:项目有两个父工程,管理了jdk版本,管理了maven的resources配置,管理了常用依赖的版本.
jdk版本:重写父工程的java.version.重新制定jdk版本
dependency依赖:配置启动器依赖。
spring-boot-maven-plugin打包插件:打jar包的插件,配置启动类位置
项目运行方式
jar包运行:java -jar jar包名称
war包运行:为了tomcat调优,或者不用tomcat,需要打war包
1
2
3
4
| <packaging>war</packaging>
<build>
<finalName>war包名称</finalName>
</build>
|
- 默认tomcat启动器,设置scope为provided,避免与本地tomcat冲突
1
2
3
4
5
| <dependency>
<groupId>org.springframework.boot</groupId>
<artifactId>spring-boot-starter-tomcat</artifactId>
<scope>provided</scope>
</dependency>
|
- 要有入口配置类,等价于web.xml,配置类从SpringBootServletInitializer抽象类派生,重写configure方法,把配置类加到环境中
1
2
3
4
5
6
7
8
9
10
| import org.springframework.boot.builder.SpringApplicationBuilder;
import org.springframework.boot.web.servlet.support.SpringBootServletInitializer;
public class WebServletInit extends SpringBootServletInitializer {
@Override
protected SpringApplicationBuilder configure(SpringApplicationBuilder builder) {
return builder.sources(Boot1Application.class);
}
}
|
配置文件
- application**.yml:这个更常用**
- application**.properties:这个的优先级更高**,重复配置以properties为主
- 存放位置:
- /
- /config
- src/main/resources/.yml或者.properties
- src/main/resources/config/.yml或者.properties,优先级最高
启动类
- @SpringBootApplicaiotn
- @SpringBootConfiguration:表示当前类是一个配置类。
- @EnableAutoConfiguration:开启自动配置
- @AutoConfigurationPackage:设置包扫描范围。获取启动类所在的包作为扫描包范围。
- @Import({AutoConfigurationImportSelector.class}):
- 选择到META-INF/spring.factories文件,找到key为org.springframework.boot.autoconfigure.EnableAutoConfiguration的值,选择到117个配置类。通过Import注解导入到总配置类。
- @ComponentScan:包扫描
- @Controller,@Service,@Repository,@Bean,@Value,@Component,@AutoWired,@Resource,@Configuration
1
2
3
4
5
| public static void main(String[] args) {
SpringApplication.run(WebcrmApplication.class, args);
}
"启动tomcat,filter,listener,启动标志,启动日志"
|
获取配置类中的自定义注解
@Value注解
- @Value注解获取properties配置文件中的数据,例:@Value(“${key}”)
- @PropertySource(“classpath:自定义properties文件的名称”),写到配置类上。
@ConfigurationProperties(prefix=””)
1
2
3
4
5
| jdbc:
url: jdbc:mysql://localhost:3306/jtxyh
driverClassName: com.javasm.Driver
userName: root
password: root
|
1
2
3
4
5
6
| @ConfigurationProperties(prefix = "jdbc")
public class MyDataSourceProperties {
private String url;
private String driverClassName;
private String userName;
private String password;
|
自定义banner
在resources下添加banner.txt,自动加载
自定义欢迎页
在resources/resources或resources/static或resources/public或/下自定义一个index.html文件,优先级由高到低
替换ico图标
在静态资源路径下放favicon.ico图标
在tomcat下的root下放favicon.ico
在页面的link标签引入favicon.ico
使用
自定义拦截器,消息转换器
使用核心接口WebMvcConfigurer 来自定义扩展
1
2
3
4
5
6
7
8
9
10
11
12
13
14
15
16
17
18
19
20
21
22
23
24
25
26
27
28
29
30
31
32
33
| @Configuration
public class MyWebMvcConfigurer implements WebMvcConfigurer {
@Override
public void addViewControllers(ViewControllerRegistry registry) {
registry.addViewController("/login").setViewName("login");
registry.addViewController("/uinfo").setViewName("uinfo");
registry.addViewController("/cinfo").setViewName("cinfo");
registry.addViewController("/minfo").setViewName("minfo");
}
@Override
public void addInterceptors(InterceptorRegistry registry) {
registry.addInterceptor(new MyInterceptor()).addPathPatterns("/**").excludePathPatterns("/login","/");
}
@Override
public void addFormatters(FormatterRegistry registry) {
registry.addConverter(new MyDateFormater());
}
@Override
public void addResourceHandlers(ResourceHandlerRegistry registry) {
registry.addResourceHandler("/static/**").addResourceLocations("classpath:/static/");
}
}
|
异常处理
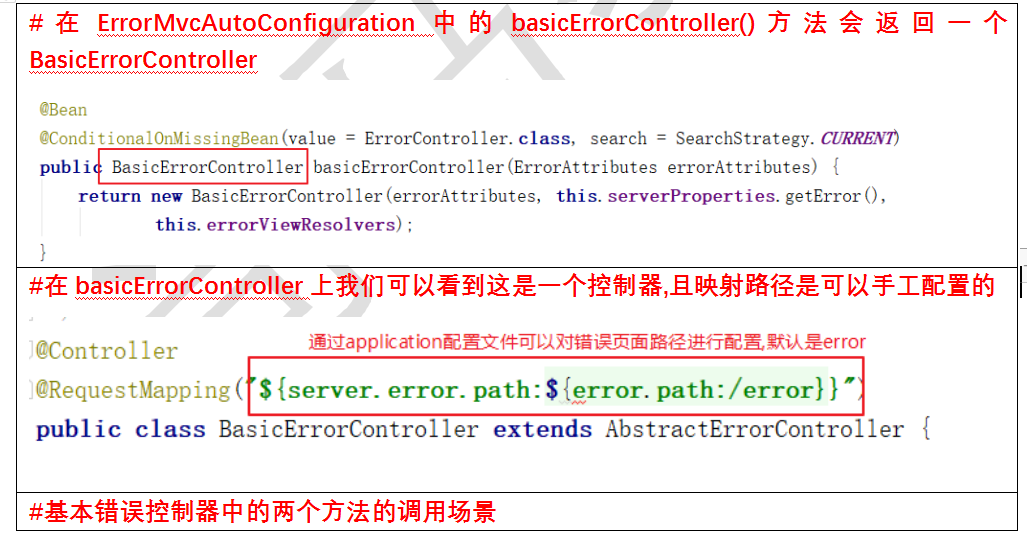
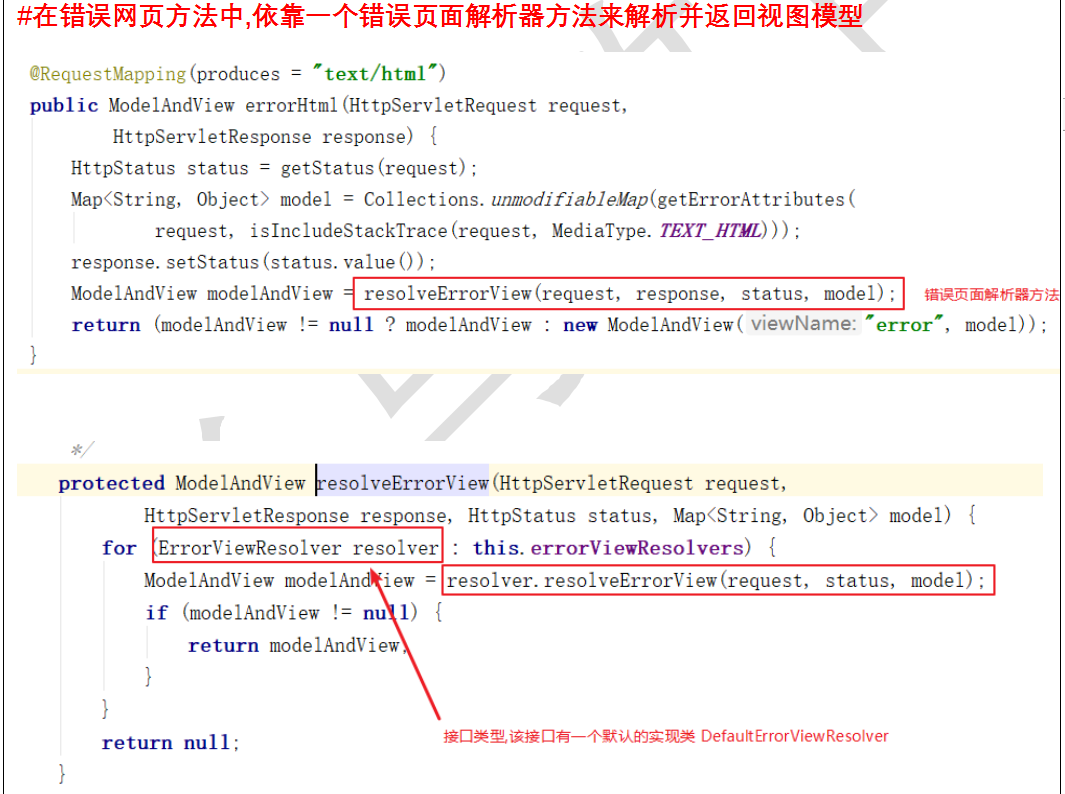
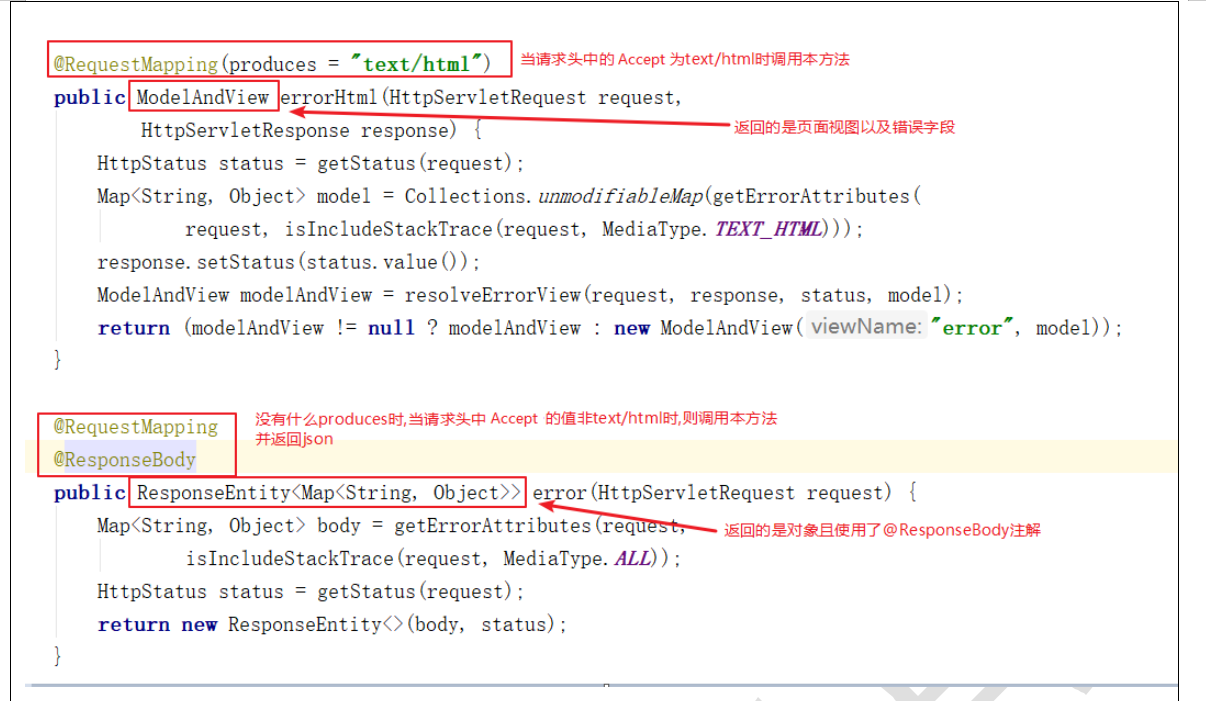
- 在SpringBoot中,自动配置机制会加载ErrorMvcAutoConfiguration类,在该类中由basicErrorController主要负责发生错误后的页面跳转,而basicErrorController中的errorHtml()和error()方法就分别是返回html和json的两个控制器。
- 当用浏览器访问时,出错,返回错误页面,页面包含
- timestamp,status,message,error,path
- 当非浏览器客户端访问时,返回的json字符串,
1
2
3
4
5
| {
"timestamp": "2019-12-20T02:27:45.856+0000",
"status": 404, "error": "Not Found",
"message": "No message available",
"path": "/page"}
|
自定义异常处理
- 自定义错误信息:从DefaultErrorAttributes派生子类
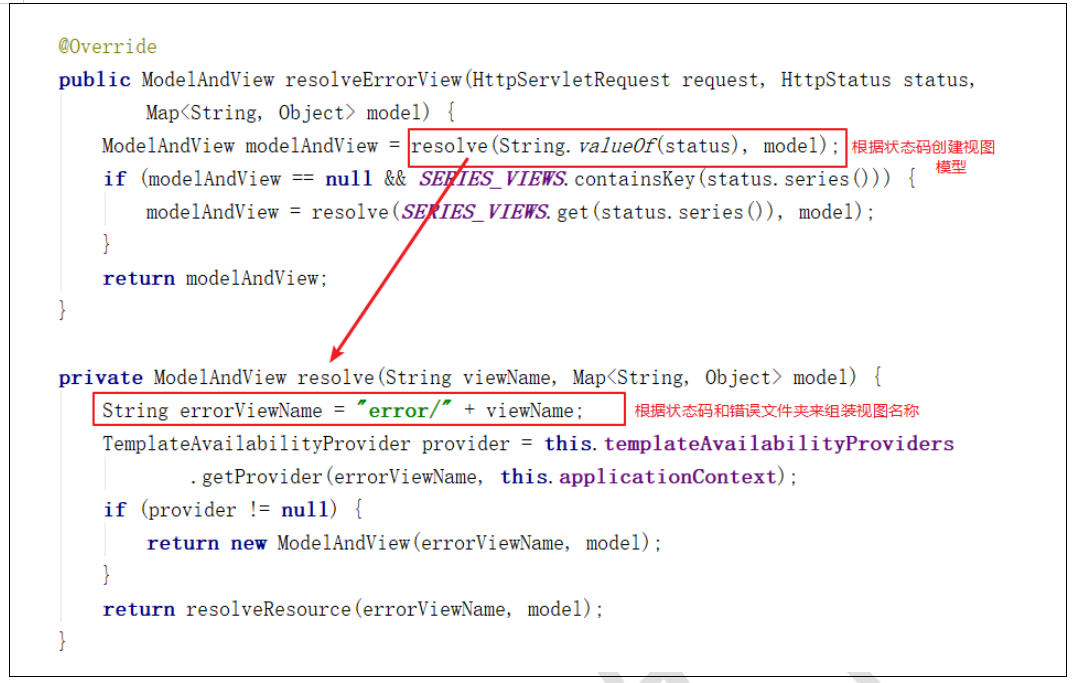
- 自定义错误页面:
- 创建error.html,得到自定义错误信息
- 或者创建error目录,下加4xx.html,5xx.html
1
2
3
4
5
6
7
8
| public class MyErrorAttributes extends DefaultErrorAttributes {
@Override
public Map<String, Object> getErrorAttributes(WebRequest webRequest, boolean includeStackTrace) {
Map<String, Object> map = super.getErrorAttributes(webRequest, includeStackTrace);
return map;
}
}
|
日志集成
SpringBoot默认集成有日志功能,使用的是Apache的commons-logging做日志的输出功能,且使用的logback的日志机制
替换默认使用的日志:
排除默认的logging依赖
1
2
3
4
5
6
7
8
9
10
11
| <dependency>
<groupId>org.springframework.boot</groupId>
<artifactId>spring-boot-starter-thymeleaf</artifactId>
<exclusions>
<exclusion>
<artifactId>spring-boot-starter-logging</artifactId>
<groupId>org.springframework.boot</groupId>
</exclusion>
</exclusions>
</dependency>
|
加入log4j2依赖
1
2
3
4
| <dependency>
<groupId>org.springframework.boot</groupId>
<artifactId>spring-boot-starter-log4j2</artifactId>
</dependency>
|
自定义log4j2模板
1
2
3
4
5
6
7
8
9
10
11
12
13
14
15
16
17
18
19
20
21
22
23
24
25
26
27
28
29
30
31
32
33
34
35
36
37
38
39
40
41
42
43
44
45
46
47
48
49
50
51
52
53
54
55
56
57
58
59
60
61
62
63
64
65
66
67
68
69
70
71
72
73
74
75
76
77
78
79
80
81
82
83
84
85
86
87
88
89
90
91
92
93
94
95
96
97
98
99
100
101
102
103
104
105
106
107
108
109
110
111
112
113
114
115
116
117
118
119
120
121
122
123
| <?xml version="1.0" encoding="UTF-8"?>
<configuration>
<appenders>
<console name="Console" target="SYSTEM_OUT">
<PatternLayout
pattern="%d{HH:mm:ss.SSS} [%t] %-5level %class %L %M -- %msg%n" />
</console>
<RollingFile name="RollingFileDebug"
fileName="E:/logs/debug.log"
filePattern="E:/logs/$${date:yyyy-MM-dd}/debug-%d{yyyy-MM-dd}-%i.log">
<Filters>
<ThresholdFilter level="DEBUG" />
<ThresholdFilter level="INFO" onMatch="DENY"
onMismatch="NEUTRAL" />
</Filters>
<PatternLayout
pattern="%d{HH:mm:ss.SSS} [%t] %-5level %class{36} %L %M - %msg%n" />
<Policies>
<SizeBasedTriggeringPolicy size="100 MB" />
</Policies>
<DefaultRolloverStrategy max="20" />
</RollingFile>
<RollingFile name="RollingFileInfo"
fileName="E:/logs/info.log"
filePattern="E:/logs/$${date:yyyy-MM-dd}/info-%d{yyyy-MM-dd}-%i.log">
<Filters>
<ThresholdFilter level="INFO" />
<ThresholdFilter level="WARN" onMatch="DENY"
onMismatch="NEUTRAL" />
</Filters>
<PatternLayout
pattern="%d{HH:mm:ss.SSS} %-5level %class{36} %L %M - %msg%xEx%n" />
<Policies>
<SizeBasedTriggeringPolicy size="100 MB" />
</Policies>
<DefaultRolloverStrategy max="20" />
</RollingFile>
<RollingFile name="RollingFileWarn"
fileName="E:/logs/warn.log"
filePattern="E:/logs/$${date:yyyy-MM}/warn-%d{yyyy-MM-dd}-%i.log">
<Filters>
<ThresholdFilter level="WARN" />
<ThresholdFilter level="ERROR" onMatch="DENY"
onMismatch="NEUTRAL" />
</Filters>
<PatternLayout
pattern="[%d{HH:mm:ss:SSS}] [%p] - %l - %m%n" />
<Policies>
<SizeBasedTriggeringPolicy size="100 MB" />
</Policies>
<DefaultRolloverStrategy max="20" min="0" />
</RollingFile>
<RollingFile name="RollingFileError"
fileName="E:/logs/error.log"
filePattern="E:/logs/$${date:yyyy-MM}/error-%d{yyyy-MM-dd}-%i.log">
<Filters>
<ThresholdFilter level="ERROR" />
<ThresholdFilter level="FATAL" onMatch="DENY"
onMismatch="NEUTRAL" />
</Filters>
<PatternLayout
pattern="[%d{HH:mm:ss:SSS}] [%p] - %l - %m%n" />
<Policies>
<SizeBasedTriggeringPolicy size="100 MB" />
</Policies>
<DefaultRolloverStrategy max="20" min="0" />
</RollingFile>
</appenders>
<loggers>
<root level="debug">
<appender-ref ref="Console"/>
<appender-ref ref="RollingFileDebug"/>
<appender-ref ref="RollingFileInfo"/>
<appender-ref ref="RollingFileWarn"/>
<appender-ref ref="RollingFileError"/>
</root>
<logger name="org.springframework" level="error"></logger>
<logger name="org.mybatis.spring" level="error"></logger>
<logger name="org.apache.ibatis" level="error"></logger>
</loggers>
</configuration>
|
使用
1
2
3
4
| import org.slf4j.Logger;
import org.slf4j.LoggerFactory;
private Logger l = LoggerFactory.getLogger(UinfoHandler.class);
|
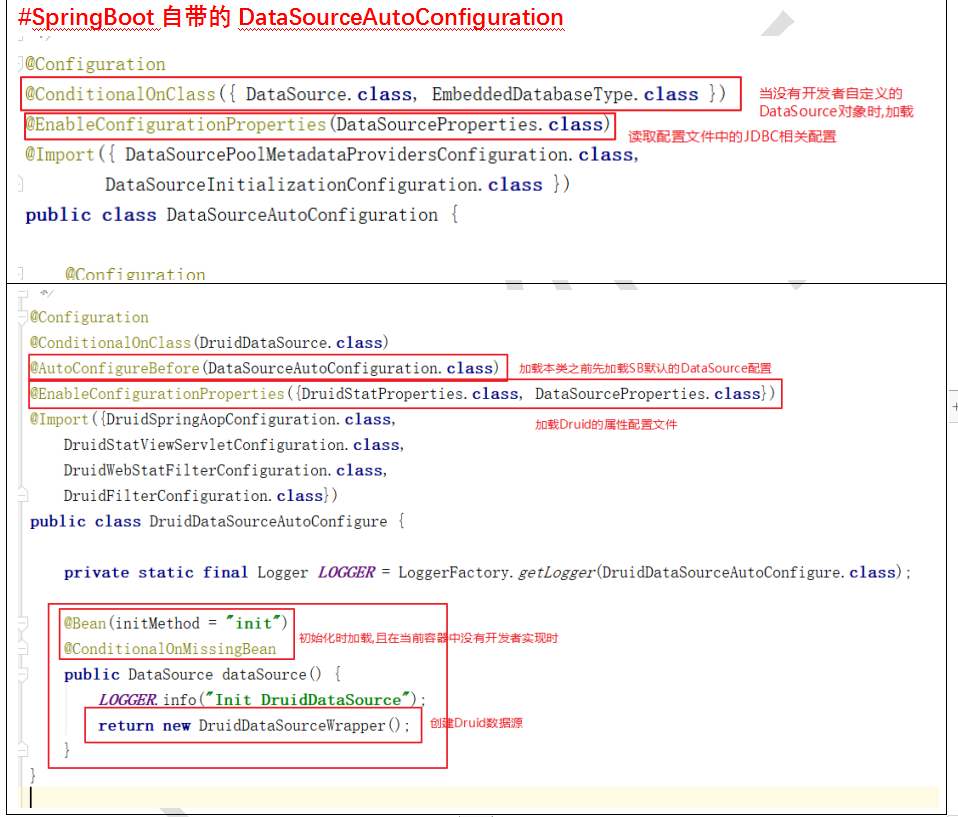
Mybatis集成
- 在SpringBoot中默认采用DataSourceAutoConfiguration来配置数据源(DataSource)。官方默认只需要在application配置文件中使用简单的配置就可以连接数据库。
- 当加入了Druid-starter之后,它的DruidDataSourceAutoConfigure默认初始化了一个创建DataSource的方法。而这个DataSource默认就是读取当前application配置文件中的spring.datasource.druid的值,由此创建了基于Druid的数据源
在pom.xml添加依赖
1
2
3
4
5
6
7
8
9
10
11
12
13
14
15
16
17
18
19
20
21
22
|
<dependency>
<groupId>org.mybatis.spring.boot</groupId>
<artifactId>mybatis-spring-boot-starter</artifactId>
<version>1.3.2</version>
</dependency>
<dependency>
<groupId>mysql</groupId>
<artifactId>mysql-connector-java</artifactId>
<scope>runtime</scope>
</dependency>
<dependency>
<groupId>com.alibaba</groupId>
<artifactId>druid-spring-boot-starter</artifactId>
<version>1.1.10</version>
</dependency>
<dependency>
<groupId>com.github.pagehelper</groupId>
<artifactId>pagehelper-spring-boot-starter</artifactId>
<version>1.2.12</version>
</dependency>
|
配置java目录下的配置资源扫描和逆向工程插件
1
2
3
4
5
6
7
8
9
10
11
12
13
14
15
16
17
18
19
20
21
22
23
24
25
26
27
28
29
| <build>
<resources>
<resource>
<directory>src/main/java</directory>
<includes>
<include>**/*.xml</include>
</includes>
</resource>
</resources>
<plugins>
<plugin>
<groupId>org.mybatis.generator</groupId>
<artifactId>mybatis-generator-maven-plugin</artifactId>
<version>1.3.2</version>
<dependencies>
<dependency>
<groupId>mysql</groupId>
<artifactId>mysql-connector-java</artifactId>
<version>5.1.34</version>
</dependency>
</dependencies>
<configuration>
<overwrite>true</overwrite>
<configurationFile>src/main/resources/generator.xml</configurationFile>
</configuration>
</plugin>
</plugins>
</build>
|
配置数据库连接信息
1
2
3
4
5
6
7
8
9
10
11
12
13
14
15
16
17
18
19
20
21
22
23
24
25
26
27
28
29
30
31
32
33
34
35
| spring:
datasource:
name: mysql_test
type: com.alibaba.druid.pool.DruidDataSource
druid:
filters: stat
driver-class-name: com.mysql.cj.jdbc.Driver
url: jdbc:mysql://localhost:3306/mybatis?useUnicode=true&characterEncoding=UTF-8&allowMultiQueries=true&serverTimezone=GMT%2B8&useSSL=false
username: root
password: jiang110
initial-size: 1
min-idle: 1
max-active: 20
max-wait: 60000
time-between-eviction-runs-millis: 60000
min-evictable-idle-time-millis: 300000
validation-query: SELECT 'x'
test-while-idle: true
test-on-borrow: false
test-on-return: false
mybatis:
mapper-locations: classpath:io/jtxyh/webcrm/*/mapper/*.xml
type-aliases-package: io.jtxyh.webcrm
|
启动MapperScan扫描
1
2
|
@MapperScan(basePackages = "io.jtxyh.webcrm.*.mapper")
|
开启注解式事务
1
2
3
|
@EnableTransactionManagement
|
Redis集成
1
2
3
4
5
6
7
8
9
10
11
12
13
14
15
16
17
18
19
20
21
22
|
<dependency>
<groupId>org.springframework.boot</groupId>
<artifactId>spring-boot-starter-data-redis</artifactId>
<exclusions>
<exclusion>
<groupId>io.lettuce</groupId>
<artifactId>lettuce-core</artifactId>
</exclusion>
</exclusions>
</dependency>
<dependency>
<groupId>redis.clients</groupId>
<artifactId>jedis</artifactId>
</dependency>
<dependency>
<groupId>com.alibaba</groupId>
<artifactId>fastjson</artifactId>
<version>1.2.58</version>
</dependency>
|
1
2
3
4
5
| spring:
redis:
host: 127.0.0.1
port: 6379
password: root
|
1
2
3
4
5
6
7
8
9
10
11
12
13
14
15
16
17
18
19
| @Autowired
private StringRedisTemplate rt;
private String key = "uinfo:";
@GetMapping("select/{uid}")
public Uinfo selectUinfoById(@PathVariable("uid") String uid){
ValueOperations<String, String> ops = rt.opsForValue();
Uinfo uinfo = null;
String redisKey = key+uid;
String ouinfo = ops.get(redisKey);
if(ouinfo == null){
uinfo = us.selectByPrimaryKey(uid);
ops.set(redisKey, JSON.toJSONString(uinfo));
}else {
uinfo = JSON.parseObject(ouinfo,Uinfo.class);
}
return uinfo;
}
|
- redis默认使用了StringRedisTemplate和RedisTemplate,做序列化存储
- StringRedisTemplate默认泛型都是String,默认采用string做序列化
- RedisTemplate默认泛型都是Object,默认采用JDK做序列化
- 可以重写RedisTemplate方法,改变默认的序列方式
1
2
3
4
5
6
7
8
9
10
11
12
13
14
15
|
@Bean
public RedisTemplate<Object, Object> redisTemplate(RedisConnectionFactory redisConnectionFactory) throws UnknownHostException {
RedisTemplate<Object, Object> template = new RedisTemplate();
template.setConnectionFactory(redisConnectionFactory);
template.setKeySerializer(new StringRedisSerializer());
template.setKeySerializer(new GenericFastJsonRedisSerializer());
template.setHashKeySerializer(new StringRedisSerializer());
template.setHashValueSerializer(new GenericFastJsonRedisSerializer());
return template;
}
|
注解式使用redis
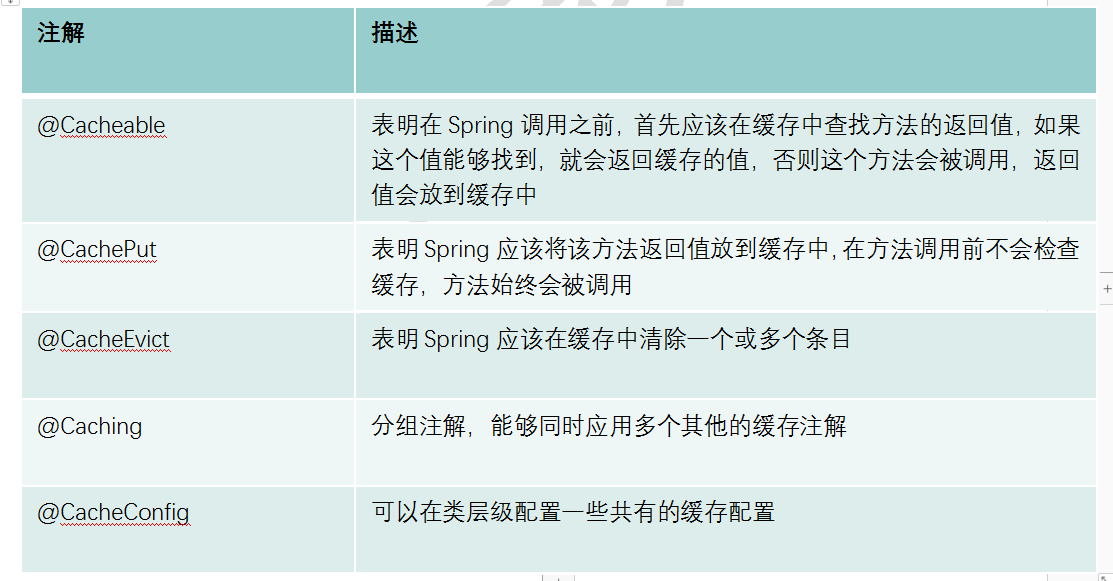
在启动类上加**@EnableCaching**
在需要使用redis的类上使用注解
1
2
3
4
5
6
7
8
9
10
11
12
13
14
15
16
17
18
|
@Cacheable(cacheNames = "userinfo",key = "#uid",unless = "#result==null")
public Uinfo getUserById(@PathVariable("uid") int uid){
Uinfo sysuser = sm.selectByPrimaryKey(uid);
return sysuser;
}
@GetMapping("/udel/{uid}")
@CacheEvict(cacheNames = "userinfo",key = "#uid")
public int delUserById(@PathVariable("uid") int uid){
int rows = sm.deleteByPrimaryKey(uid);
return rows;
}
|
定时任务
引入依赖
1
2
3
4
| <dependency>
<groupId>org.springframework.boot</groupId>
<artifactId>spring-boot-starter-quartz</artifactId>
</dependency>
|
在启动类上加注解开启定时任务
使用
1
2
3
4
5
6
7
8
| @Component
public class MyQuery {
@Scheduled(cron = "0 0/5 * * * ?")
public void run(){
System.out.println("定时任务执行了。。。。");
}
}
|
兼容jsp
不抛出404页面
1
2
3
4
5
| spring:
mvc:
throw-exception-if-no-handler-found: true
resources:
add-mappings: false
|
相关文章
数据库连接池
SpringIOC
Junit和Spring
Tomcat
Servlet
Request,Response和ServletContext
Cookie和Session
JSP和EL和Jstl
Filter和Listener
Mybatis