基础
Spring官方文档
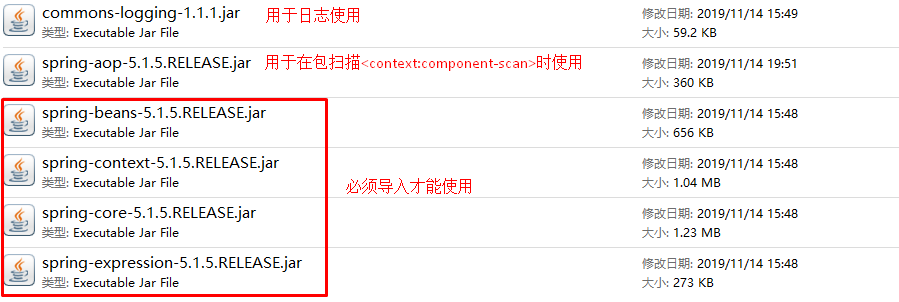
概述:Spring是一个开源的控制反转(Inversion of Control ,IoC)和面向切面(AOP)的容器框架.帮助开发人员分离组件之间的依赖关系,它的主要目的是简化企业开发。
CORE需要的jar包
使用步骤:
- 导入相关jar包
- 创建spring的xml配置文件,配置bean标签或者包扫描和相关注解
- 使用ClassPathXMLApplicationContext加载xml文件,初始化spring容器
- 从容器中获取对象
1
2
3
4
5
6
7
8
9
10
11
12
13
14
15
16
17
18
19
20
21
| "xml配置文件"
<?xml version="1.0" encoding="UTF-8"?>
<beans xmlns="http://www.springframework.org/schema/beans"
xmlns:xsi="http://www.w3.org/2001/XMLSchema-instance"
xmlns:context="http://www.springframework.org/schema/context"
xsi:schemaLocation="http://www.springframework.org/schema/beans
https://www.springframework.org/schema/beans/spring-beans.xsd
http://www.springframework.org/schema/context
https://www.springframework.org/schema/context/spring-context.xsd">
<bean id="myUserDao" class="io.jtxyh.dao.impl.UserDaoImpl"></bean>
<bean id="myUserService" class="io.jtxyh.service.impl.UserServiceImpl">
成员变量字符串赋值
<property name="str" value="永远相信美好的事情即将发生"></property>
为成员变量对象赋值
<property name="usDao" ref="myUserDao"></property>
</bean>
</beans>
|
1
2
3
4
5
6
7
8
9
10
11
12
13
14
15
| "java代码"
public static void main(String[] args) {
初始化容器的时候就默认执行了对象的无参构造new了,bean对象已经创建了,是单例的
ApplicationContext s = new ClassPathXmlApplicationContext("applicationContext.xml");
按照名称查找bean对象
UserServiceImpl myUserService = s.getBean("myUserService",UserServiceImpl.class);
按照类型查找bean对象
UserService myUserService2 = s.getBean(UserService.class);
调用方法
myUserService.getUser();
myUserService2.getUser();
}
|
生命周期:默认单例,容器初始化即创建bean,在bean标签中设置scope=”prototype” 更改默认状态,改为多例,容器初始化不创建,每个getBean创建新的bean
IOC控制反转
- 使用第三方组件容器,使应用本身不在依赖于对象的创建与维护,而是交给第三方容器来创建与维护
XML实现方式
- 通过在xml文件中配置bean对象
- id属性:给bean设置一个名字
- class属性:使用的对象的位置
- init-method属性:初始化时执行的方法
- destory-method属性:销毁时执行的方法
- 通过在xml文件中实现包扫描的方式配合注解使用
- base-package属性:扫描的位置
- @Controller:标注控制层组件
- @Service:标注业务层组件
- @Repository:标注数据访问组件,即DAO组件
- @Component:组件,当组件不好归类的时候,我们可以使用这个注解进行标注
- @Autowired:成员变量或set方法上
- @Resource:成员变量或set方法上
- @Scope:指定scope作用域的(用在类上)
- @PostConstruct:指定初始化方法(用在方法上)
- @PreDestory:指定销毁方法(用在方法上)
- 使用时需要用ClassPathXmlApplicationContext来加载配置
1
2
3
4
5
6
7
8
| bean对象方式
<bean id="myUserDao" class="io.jtxyh.dao.impl.UserDaoImpl"></bean>
引入另一个xml配置文件
<import resource="classpath:applicationContext2.xml" />
包扫描方式
<context:component-scan base-package="io.jtxyh"></context:component-scan>
|
1
2
3
4
5
6
7
8
9
| '使用'
public static void main(String[] args) {
'使用包扫描的形式初始化容器'
ApplicationContext ac = new ClassPathXmlApplicationContext("applicationContext.xml");
'包扫描出来的bean的id为类名的首字母小写'
UserServiceImpl bean = ac.getBean("userServiceImpl",UserServiceImpl.class);
'在UserServiceImpl中实现了自动装配,所有调用UserDao不会出现异常'
bean.getUser();
}
|
CLASS类配置方式
- 在类上加**@ComponentScan(“扫描的地址”)**进行包扫描
- 需要在类上加**@Configuration**注解让包被扫描到
- 需要引入properties配置文件时,在类上加**@PropertySource(“classpath:文件名称”)**
- 通过**@Value(${properties文件中的key名})**,引入信息赋值到成员变量中
- 在特殊的类上需要装配bean,在方法上加**@Bean**注解
- 使用时需要用AnnotationConfigApplicationContext来加载类配置
1
2
3
4
5
6
7
8
9
10
11
12
13
14
15
16
17
18
19
20
21
22
23
24
25
26
27
28
29
30
31
32
33
34
35
36
37
38
39
40
41
42
43
44
45
46
47
48
49
50
51
52
53
54
55
56
57
| '设置类配置'
@Configuration
'进行包扫描'
@ComponentScan("io.jtxyh")
'引入properties配置文件,classpath代表的是类的根路径'
@PropertySource("classpath:jdbc.properties")
public class ApplicationConfig {
'写一个bean对象,返回值必须是实现的那个bean'
'先根据形参名去容器中找对象,再按照类型查找。'
'不能装配两次,进行包扫描后的类不能再用bean'
@Bean
public UserInfo getUseDao() {
UserInfo us = new UserInfo();
us.setUid(111);
return us;
}
'通过@Value(${properties文件中的key名}),引入信息赋值到成员变量中'
@Value("${driver}")
private String driver;
@Value("${url}")
private String url;
@Value("${uname}")
private String uname;
@Value("${upass}")
private String upass;
'自定义数据库连接池对象的bean'
@Bean
public DataSource getDataSource() {
DruidDataSource ds = new DruidDataSource();
ds.setDriverClassName(driver);
ds.setUrl(url);
ds.setUsername(uname);
ds.setPassword(upass);
ds.setInitialSize(3);
try {
ds.init();
} catch (SQLException e) {
e.printStackTrace();
}
return ds;
}
'使用'
public static void main(String[] args) {
ApplicationContext ac = new AnnotationConfigApplicationContext(applicationConfig.class);
UserInfo bean1 = ac.getBean(UserInfo.class);
System.out.println(bean1.getUid());
'bean对象自动执行了getDataSource方法'
DataSource bean2 = ac.getBean(DataSource.class);
System.out.println(bean2);
}
|
DI注入
set注入
- 通过bean标签的中的property实现
- name属性:bean指代对象中变量的属性名
- value属性:传入的值(当值为基本数据类型和引用数据类型时使用)
- ref属性:当值为对象时使用
1
2
3
4
5
6
7
8
| <bean id="myUserDao" class="io.jtxyh.dao.impl.UserDaoImpl"></bean>
<bean id="myUserService" class="io.jtxyh.service.impl.UserServiceImpl">
成员变量字符串赋值
<property name="str" value="永远相信美好的事情即将发生"></property>
为成员变量对象赋值
<property name="usDao" ref="myUserDao"></property>
</bean>
|
构造器注入
- 通过constructor-arg包扫描方式实现,属性同property
1
2
3
4
5
6
7
| <bean id="myUserDao" class="io.jtxyh.dao.impl.UserDaoImpl"></bean>
<bean id="myUserService2" class="io.jtxyh.service.impl.UserServiceImpl">
使用constructor-arg为成员变量对象赋值
<constructor-arg name="usDao" ref="myUserDao"></constructor-arg>
<constructor-arg name="str" value="永远相信美好的事情即将发生"></constructor-arg>
</bean>
|
自动装配
1
2
| 扫描io.jtxyh下所有有注解的类
<context:component-scan base-package="io.jtxyh"></context:component-scan>
|
1
2
3
4
5
6
7
8
9
| 自动装配,配合包扫描使用,UseDao是一个对象
@Autowired
private UseDao usDao;
在UseDao实现类上配置
@Repository
public class UserDaoImpl implements UseDao{
}
|
集合注入
- 使用property中的相关标签
- list:注入List集合
- array:注入Array数组
- map:注入Map集合
- entry:有属性key和value,分别填写map的键和值
1
2
3
4
5
6
7
8
9
10
11
12
13
14
15
16
17
18
19
20
21
22
23
| <bean id="ListAdd" class="io.jtxyh.service.impl.UserServiceImpl">
<property name="myList">
<list>
<value>list值1</value>
<value>list值2</value>
<value>list值3</value>
</list>
</property>
<property name="myArray">
<array>
<value>Array值1</value>
<value>Array值2</value>
<value>Array值3</value>
</array>
</property>
<property name="myMap">
<map>
<entry key="1" value="Map值1"></entry>
<entry key="2" value="Map值2"></entry>
<entry key="3" value="Map值3"></entry>
</map>
</property>
</bean
|
内部bean注入
1
2
3
4
5
6
7
| <bean id="myUserService2" class="io.jtxyh.service.impl.UserServiceImpl">
<constructor-arg name="usDao">
内部bean注入
<bean class="io.jtxyh.dao.impl.UserDaoImpl"></bean>
</constructor-arg>
<constructor-arg name="str" value="永远相信美好的事情即将发生"></constructor-arg>
</bean>
|
相关文章
数据库连接池
Junit和Spring
SpringAOP
Tomcat
Servlet
Request,Response和ServletContext
Cookie和Session
JSP和EL和Jstl
Filter和Listener
Mybatis