爬虫知识
requests模块 安装:pip install requests
requests模块发送get请求
1 2 3 4 5 6 7 8 9 10 11 12 import requests 'https://www.baidu.com' print (response.text)print (response.content.decode())
response response.text 和response.content区别 response.text
类型:str
解码类型: requests模块自动根据HTTP 头部对响应的编码作出有根据的推测,推测的文本编码
response.content
属性
response = requests.get(url)中response是发送请求获取的响应对象;response响应对象中除了text、content获取响应内容以外还有其它常用的属性或方法:
response.url响应的url;有时候响应的url和请求的url并不一致response.status_code 响应状态码response.request.headers 响应对应的请求头response.headers 响应头response.request._cookies 响应对应请求的cookie;返回cookieJar类型response.cookies 响应的cookie(经过了set-cookie动作;返回cookieJar类型response.json()自动将json字符串类型的响应内容转换为python对象(dict or list
1 2 3 4 "GBK" )
1 2 3 4 5 6 7 8 9 10 11 12 13 14 15 16 import requests'https://www.baidu.com' print (response.url) print (response.status_code) print (response.request.headers) print (response.headers) print (response.request._cookies) print (response.cookies)
携带参数 1 2 3 4 5 6 7 8 9 10 11 12 13 14 15 import requests'https://www.baidu.com' "User-Agent" : "请求头" ,'Cookie' : 'xxx这里是复制过来的cookie字符串' 'wd' : 'python' }
cookies使用 1 2 3 4 5 6 7 8 9 10 11 12 13 14 15 16 17 import requests'https://github.com/USER_NAME' 'User-Agent' : '请求头' '从浏览器中copy过来的cookies字符串' '=' )[0 ]:cookie.split('=' )[-1 ] for cookie in cookies_str.split('; ' )}print (resp.text)
cookieJar对象转换为cookies字典的方法
1 2
timeout使用 1 2 3 4 import requests'https://twitter.com' 3 )
代理 1 2 3 4 5 proxies = { "http" : "http://12.34.56.79:9527" , "https" : "https://12.34.56.79:9527" ,
忽略CA证书 1 2 3 import requests"https://sam.huat.edu.cn:8443/selfservice/" False )
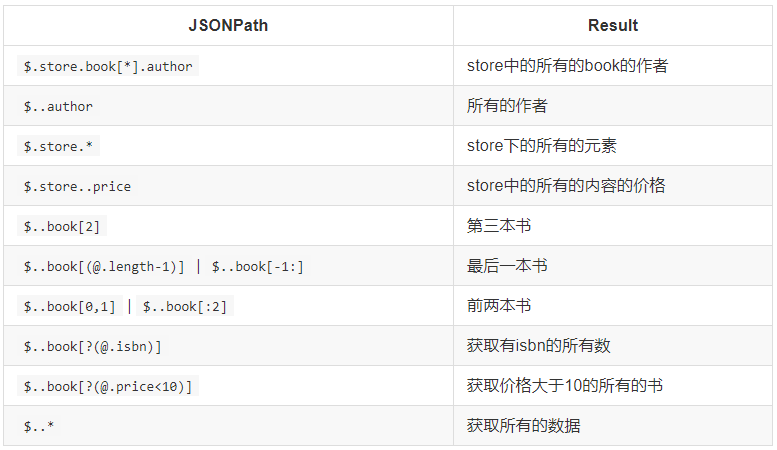
jsonpath模块 安装:pip install jsonpath
1 2 from jsonpath import jsonpath'jsonpath语法规则字符串' )
1 2 3 4 5 6 7 8 9 10 11 12 13 14 15 16 17 18 19 20 21 22 23 24 book_dict = { "store" : {"book" : [ "category" : "reference" ,"author" : "Nigel Rees" ,"title" : "Sayings of the Century" ,"price" : 8.95 "category" : "fiction" ,"author" : "Evelyn Waugh" ,"title" : "Sword of Honour" ,"price" : 12.99 "bicycle" : {"color" : "red" ,"price" : 19.95 from jsonpath import jsonpathprint (jsonpath(book_dict, '$..author' ))
xpath
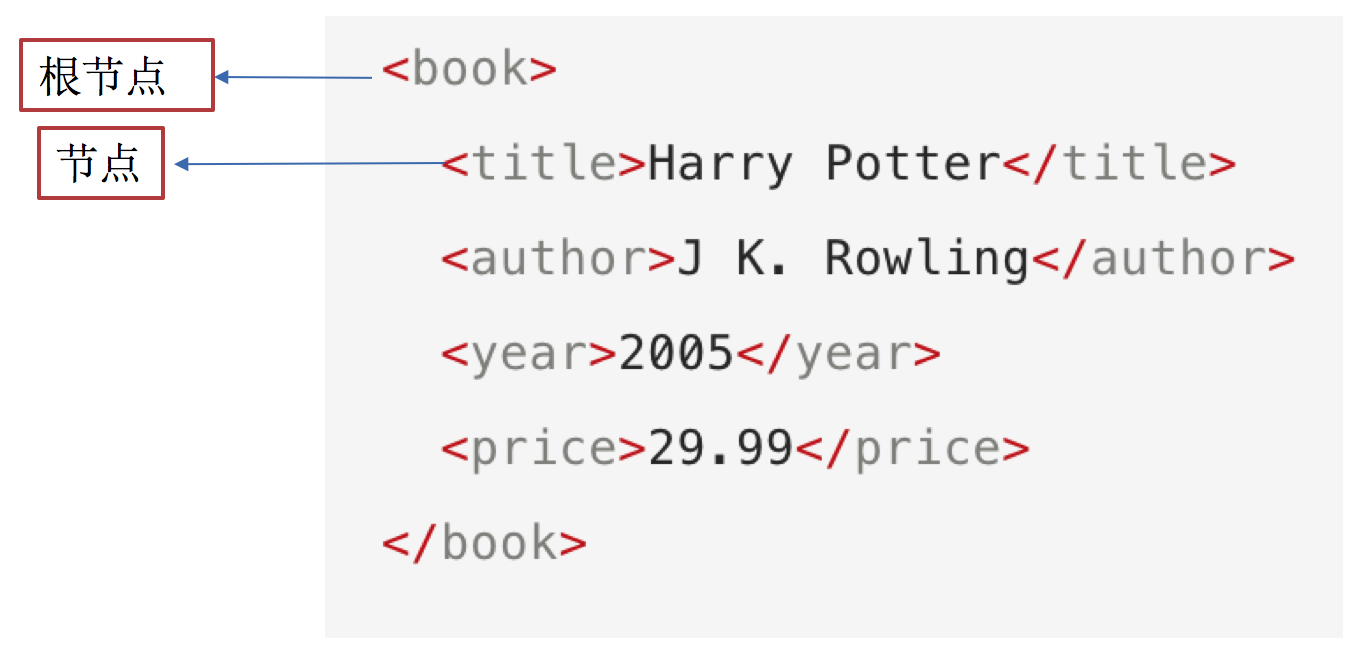
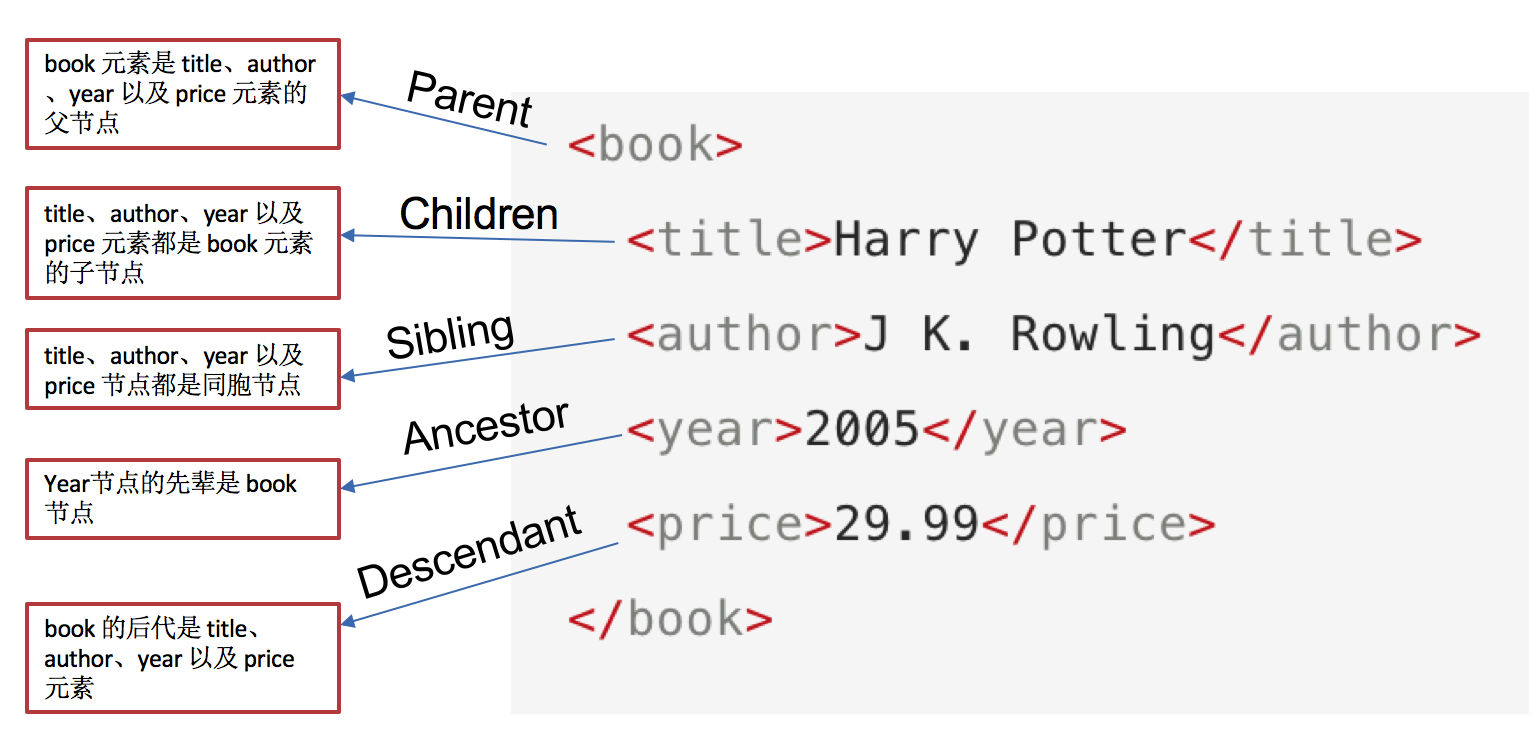
xpath节点
xpath基础语法
XPath 使用路径表达式来选取 XML 文档中的节点或者节点集。
这些路径表达式和我们在常规的电脑文件系统中看到的表达式 非常相似。
使用chrome插件选择标签时候,选中时,选中的标签会添加属性class=”xh-highlight”
表达式
描述
nodename
选中该元素。
/
从根节点选取、或者是元素和元素间的过渡。
//
从匹配选择的当前节点选择文档中的节点,而不考虑它们的位置。
.
选取当前节点。
..
选取当前节点的父节点。
@
选取属性。
text()
选取文本。
选择所有的h2下的文本://h2/text()
获取所有的a标签的href://a/@href
获取html下的head下的title的文本:/html/head/title/text()
获取html下的head下的link标签的href:/html/head/link/@href
节点修饰语法 下标
在xpath中,第一个元素的位置是1
最后一个元素的位置是last()
倒数第二个是last()-1
路径表达式
结果
//title[@lang=”eng”]
选择lang属性值为eng的所有title元素
/bookstore/book[1]
选取属于 bookstore 子元素的第一个 book 元素。
/bookstore/book[last()]
选取属于 bookstore 子元素的最后一个 book 元素。
/bookstore/book[last()-1]
选取属于 bookstore 子元素的倒数第二个 book 元素。
/bookstore/book[position()>1]
选择bookstore下面的book元素,从第二个开始选择
//book/title[text()=’Harry Potter’]
选择所有book下的title元素,仅仅选择文本为Harry Potter的title元素
/bookstore/book[price>35.00]/title
选取 bookstore 元素中的 book 元素的所有 title 元素,且其中的 price 元素的值须大于 35.00。
通配符
描述
*
匹配任何元素节点。
node()
匹配任何类型的节点。
lxml模块 安装:pip/pip3 install lxml
lxml模块的使用
导入lxml 的 etree 库
from lxml import etree
利用etree.HTML,将html字符串(bytes类型或str类型)转化为Element对象,Element对象具有xpath的方法,返回结果的列表
1 2 html = etree.HTML(text) "xpath语法规则字符串" )
xpath方法返回列表的三种情况
返回空列表:根据xpath语法规则字符串,没有定位到任何元素
返回由字符串构成的列表:xpath字符串规则匹配的一定是文本内容或某属性的值
返回由Element对象构成的列表:xpath规则字符串匹配的是标签,列表中的Element对象可以继续进行xpath
1 2 3 4 5 6 7 8 9 10 11 12 13 14 15 16 17 18 19 20 21 22 23 24 25 26 27 28 29 30 31 32 33 34 from lxml import etree''' <div> <ul> <li class="item-1"> </li> <li class="item-1"> </li> <li class="item-inactive"> </li> <li class="item-1"> </li> <li class="item-0"> a href="link5.html">fifth item</a> </ul> </div> ''' "//li[@class='item-1']/a/@href" )"//li[@class='item-1']/a/text()" )for href in href_list:"href" ] = href"title" ] = title_list[href_list.index(href)]print (item)
其他
lxml.etree.HTML(html_str)可以自动补全标签
lxml.etree.tostring函数可以将转换为Element对象再转换回html字符串
爬虫如果使用lxml来提取数据,应该以lxml.etree.tostring的返回结果作为提取数据的依据
selenium使用 Selenium是一个Web的自动化测试工具,最初是为网站自动化测试而开发的,Selenium 可以直接调用浏览器,它支持所有主流的浏览器(包括PhantomJS这些无界面的浏览器),可以接收指令,让浏览器自动加载页面,获取需要的数据,甚至页面截屏等
selenium安装 python安装:pip3 install selenium
chrome安装
https://npm.taobao.org/mirrors/chromedriver 下载对应版本的
解压压缩包后获取python代码可以调用的谷歌浏览器的webdriver可执行文件
windows环境下需要将 chromedriver.exe 所在的目录设置为path环境变量中的路径
linux/mac环境下,将 chromedriver 所在的目录设置到系统的PATH环境值中
selenium使用 1 2 3 4 5 6 7 8 9 10 11 12 13 14 15 16 17 18 19 import timefrom selenium import webdriver"https://www.baidu.com/" )'kw' ).send_keys('python' )'su' ).click()6 )
driver对象的常用属性和方法
在使用selenium过程中,实例化driver对象后,driver对象有一些常用的属性和方法
driver.page_source 当前标签页浏览器渲染之后的网页源代码driver.current_url 当前标签页的urldriver.close() 关闭当前标签页,如果只有一个标签页则关闭整个浏览器driver.quit() 关闭浏览器driver.forward() 页面前进driver.back() 页面后退driver.screen_shot(img_name) 页面截图
在selenium中可以通过多种方式来定位标签,返回标签元素对象
1 2 3 4 5 6 7 8 find_element_by_id (返回一个元素)
find_element和find_elements的区别:
多了个s就返回列表,没有s就返回匹配到的第一个标签对象
find_element匹配不到就抛出异常,find_elements匹配不到就返回空列表
by_link_text和by_partial_link_tex的区别:全部文本和包含某个文本
以上函数的使用方法
driver.find_element_by_id('id_str')
selenium标签页的切换 1 2 3 4 5 0 ])
参考代码示例:
1 2 3 4 5 6 7 8 9 10 11 12 13 14 15 16 17 18 19 20 21 22 23 24 25 26 27 28 import timefrom selenium import webdriver"https://www.baidu.com/" )1 )'kw' ).send_keys('python' )1 )'su' ).click()1 )'window.open("https://www.sogou.com");' 1 )2 )0 ])2 )1 ])6 )
switch_to切换frame标签 1 2 3 4 5 6 7 8 9 10 11 12 13 14 15 16 17 18 19 20 21 22 23 24 25 26 27 28 29 import timefrom selenium import webdriver'https://mail.qq.com/cgi-bin/loginpage' 2 )'login_frame' ) '//*[@id="u"]' ).send_keys('1596930226@qq.com' )2 )'//*[@id="p"]' ).send_keys('hahamimashicuode' )2 )'//*[@id="login_button"]' ).click()2 )"""操作frame外边的元素需要切换出去""" 0 ])'login_pictures_title' ).textprint (content)
切换到定位的frame标签嵌套的页面中:driver.switch_to.frame(通过find_element_by函数定位的frame、iframe标签对象)
利用切换标签页的方式切出frame标签
1 2 windows = driver.window_handles0 ])
selenium对cookie的处理 获取cookie
driver.get_cookies()返回列表,其中包含的是完整的cookie信息!不光有name、value,还有domain等cookie其他维度的信息。所以如果想要把获取的cookie信息和requests模块配合使用的话,需要转换为name、value作为键值对的cookie字典
1 2 3 4 print (driver.get_cookies())for cookie in driver.get_cookies()}
删除cookie 1 2 3 4 5 "CookieName" )
selenium控制浏览器执行js代码 执行js的方法:driver.execute_script(js)
1 2 3 4 5 6 7 8 9 10 11 12 import timefrom selenium import webdriver"http://www.baidu.com/" )1 )'window.scrollTo(0,document.body.scrollHeight)' 5 )
页面等待分类
强制等待
隐式等待
显式等待
强制等待 其实就是time.sleep()
缺点时不智能,设置的时间太短,元素还没有加载出来;设置的时间太长,则会浪费时间
隐式等待 隐式等待针对的是元素定位,隐式等待设置了一个时间,在一段时间内判断元素是否定位成功,如果完成了,就进行下一步
在设置的时间内没有定位成功,则会报超时加载
1 2 3 4 5 6 7 8 9 from selenium import webdriver10 ) 'https://www.baidu.com' )
显式等待 每经过多少秒就查看一次等待条件是否达成,如果达成就停止等待,继续执行后续代码
如果没有达成就继续等待直到超过规定的时间后,报超时异常
1 2 3 4 5 6 7 8 9 10 11 12 13 14 15 16 17 18 19 from selenium import webdriver from selenium.webdriver.support.wait import WebDriverWait from selenium.webdriver.support import expected_conditions as EC from selenium.webdriver.common.by import By 'https://www.baidu.com' )20 , 0.5 ).until('好123' ))) print (driver.find_element_by_link_text('好123' ).get_attribute('href' ))
selenium开启无界面模式 绝大多数服务器是没有界面的,selenium控制谷歌浏览器也是存在无界面模式的
实例化配置对象:options = webdriver.ChromeOptions()
配置对象添加开启无界面模式的命令:options.add_argument("--headless")
配置对象添加禁用gpu的命令:options.add_argument("--disable-gpu")
实例化带有配置对象的driver对象:driver = webdriver.Chrome(chrome_options=options)
注意:macos中chrome浏览器59+版本,Linux中57+版本才能使用无界面模式
1 2 3 4 5 6 7 8 9 10 11 12 from selenium import webdriver"--headless" ) "--disable-gpu" ) 'http://www.baidu.com' )print (driver.title)
phantomjs无界面浏览器 PhantomJS 是一个基于Webkit的“无界面”(headless)浏览器,它会把网站加载到内存并执行页面上的 JavaScript。下载地址:http://phantomjs.org/download.html
1 2 3 4 5 6 7 8 9 10 11 12 13 14 from selenium import webdriver '/home/worker/Desktop/driver/phantomjs' ) "http://www.baidu.com/" )"1.png" )
selenium使用代理ip 实例化配置对象:options = webdriver.ChromeOptions()
配置对象添加使用代理ip的命令:options.add_argument('--proxy-server=http://202.20.16.82:9527')
实例化带有配置对象的driver对象:driver = webdriver.Chrome('./chromedriver', chrome_options=options)
1 2 3 4 5 6 7 8 9 10 from selenium import webdriver'--proxy-server=http://202.20.16.82:9527' ) 'http://www.baidu.com' )print (driver.title)
selenium替换user-agent 实例化配置对象:options = webdriver.ChromeOptions()
配置对象添加替换UA的命令:options.add_argument('--user-agent=Mozilla/5.0 HAHA')
实例化带有配置对象的driver对象:driver = webdriver.Chrome('./chromedriver', chrome_options=options)
1 2 3 4 5 6 7 8 9 10 from selenium import webdriver'--user-agent=Mozilla/5.0 HAHA' ) './chromedriver' , chrome_options=options)'http://www.baidu.com' )print (driver.title)
相关文章
Python基础
Mongodb和Python交互
Python反爬解决方案
Mongodb和Python交互
Python反爬解决方案
Scrapy爬虫
Scrapy爬虫
Python打包可执行文件